Search This Blog

Where is TIDES INN Today?

Click here map link
The last position reports for Tides Inn will be displayed on the map. (Courtesy of www.winlink.org) Tides Inn homeport is Dare Marina, Yorktown VA

Florida, Here We Come!


    The boat is ready to go and finally so am I. Got the ok to cruise from the cardiologist following an Ablative procedure in October and Cardoversion in November to resolve my altrial-fibrilation. All systems are go and we are planning to depart on 3 Jan, following provisioning the boat and picking up refills of medical prescriptions. Getting old is not conducive to cruising. Good justification for cruising when you health supports it - not when financial security does. Sue and I are 65 and 66 and starting to experience health issues that can limit your activities. We're very glad to be able to get back to cruising at this point.
   We are heading, this winter season, to Florida waters. Will hang out in Biscayne Bay and Florida Keys for awhile and cruise up to Punta Gorda to visit friends. I love this photo of the Boca Chita anchorage and we plan to spend some time here again on this trip.

   Our last trip to the keys we arrived at Key West at sunset and cruised by the crowds on Mallory St at the waterfront.


   This is the view that all the people are lining up to watch. Sunset off Key West.  Will be good to see these sights again.


Cockpit Enclosure Rehab

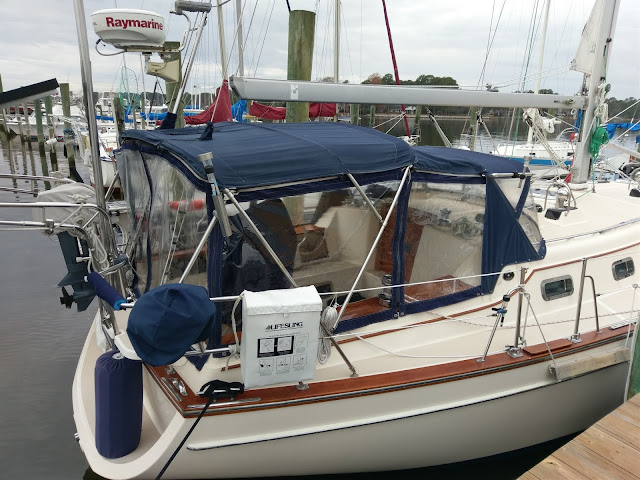
    Preparing to leave now on 1 Jan, we pulled out the cockpit enclosure side and back pieces from storage in our garage and found that the vinyl windows had hardened and cracked on most all of them. We made them with inexpensive materials since they were just our first trial. After 3 years in the sun and 2 years in storage the plastic was in bad condition.


   We sewed new plastic over the old windows, the cut the old plastic off. It is a real makeshift solution, but only has to last for this sailing season as we plan to have a new enclosure made next summer. We still need to take the pieces down to the boat and do the final fitting of the aft pieces that have cutouts for the backstays, radar mount and pushpit braces. 


   All finished and ready to head south on 1 Jan.  Hope the sun shines and keeps us toasty inside. 

Dodger Maintenance - new glass

   After 15 years it was becoming essential to replace the fogging strataglass in our dodger,
it was essentially becoming a safety issue.  We replaced the center pane 2 years ago before leaving the boat in storage but, we skipped the two outer panels which would be a much more challenging sewing job.

    In addition to the window panes, we noted that several of the zippers and other seams on the dodger were ripping out as the 15yr old stitching was degrading. Time for an overhaul to get us through at least one more season before we totally replace the dodger/bimini/enclosure.
    Re-sewing the zippers and seams was pretty straightforward. We noted the zippers and some of the dodger material is on its last legs, but should last for one more sailing season.


    We also replaced the sacrificial leather protection along the front of the dodger where the mainsheet rubs whenever the tension comes off of the boom sheeting. That was also straight forward sewing without having to feed the stiff plexiglass through the sewing machine.


   Sewing on the new glass was much more challenging. Three sides were no serious problem, but the last side required the dodger to be rolled up tightly (including the center window section) to pass through the sewing machine.
   Once the new glass is sewed on, you have to cut away the old glass. That turned out to also be a challenge as the old glass had become so brittle over the years that it was not possible to smoothly cut it. Instead it often broke off in shards of hard, brittle plastic. But working slowly and methodically, we removed the old glass. You can notice in the photo the old glass often cracked as we manipulated it roughly. It was definitely in need of replacement.


     It was a major task taking a couple days and several bad words being uttered but, ultimately it was a success. Here's a photo of the dodger with new glass installed. Will definitely improve our safety posture especially in low light situations and make docking a little less stressful.  Next year its all new canvas for us.


Sailing - At Last

  After 6 months of maintenance efforts to get Tides Inn ready to cruise again, its time for some sea trials. We need to spend time afloat checking out all the systems and see what is going to break before heading south for the next 6 months.
 

     Hurricane Florence provided a good opportunity to spend several days at sea to test the boat's readiness to head off for several months. Our marina requires the larger boats to vacant the marina for named storms heading our way so we had to leave the marina. Good news was that Florence stayed down to the south and we only saw 25-35kts of wind and only about 1ft of waves in the protected area where we anchor.  We had to leave the marina on Wednesday (storm arriving Thursday night) and we waited for the winds and water levels to return to normal before returning - so came back on the next Monday - giving us 6 days at sea. 

     The best result of spending 6 days afloat was it provided the time necessary to train our Lab Rivah to go potty on the boat. Just like our previous Lab, she took about 3 days of holding it before she had to go and learned her potty spot is on a rug on the bow. By the 6th day, she had the routine down and even asked to go forward when necessary.  She like the wind blowing over her, but not when she is trying to do her business.
  
   We had one full day of rainy, windy weather but the rest of the six days was relatively sunny but breezy. 
  
   All systems are working and we experienced no significant problems during the week. We have been out in the Chesapeake overnight two more times since Florence and it looks like the boat is ready to head south.  Now we just have to get me ready to head south. Heart procedure scheduled for 17 Oct.

Top Of The Mast Work - Last Items on the To-Do List

   Today was the day to finish off the Tides Inn refurbishment To-Do list - a long process we started in early April. We had to replace the anchor lightbulb, lubricate the anemometer and windex, and check all the mast top equipment for condition, then replace the radar reflector and whisker pole topping lift at the spreader level.
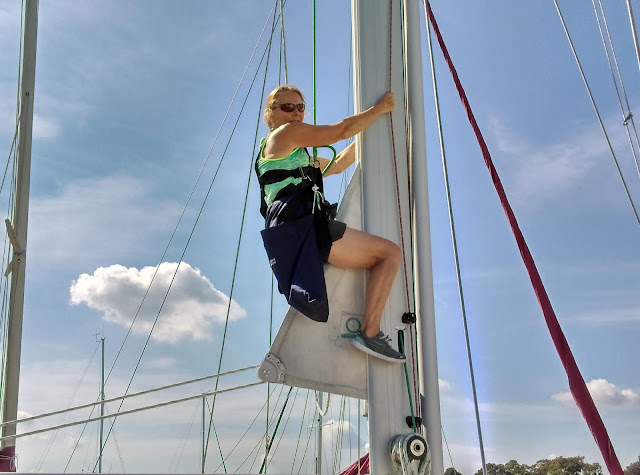
   Sue is our mast top worker and I am the hoister.

   She is on her way up. I hoist her on the spare main halyard and we use the spinnaker halyard as a safety backup. Tools and materials are in the bosun seat bag.  The spare halyard leads back to the cockpit where I winch her up. This time we both had our phones on speaker and were able to easily communicate via cell phone.
 

     Here is the line and winch that lifts her up. On the way up I can keep the rope clutch locked so there are two levels of safety that the halyard won't slip. On the way down, I have to open the clutch and its only me to ensure the line feeds out slowly. 

   Our mast is 56feet up from the water. That's a good height that lets us easily pass under the Intra-Coastal bridges which are normally 65 feet, but still pretty high up for the worker who has to change the light bulb.
   
   At this point, Sue has the anchor light bulb replaced and she is reinstalling the plexiglass housing. Our light fixture has a tri-color on top and the anchor light below. You can see the red port light of the tri-color and Sue's hand blocks the clear white anchor light. 
   

    In addition to changing the light bulb, the other key maintenance item was to lubricate the anemometer so that we get an accurate reading of the wind speed. As it accumulates dirt and dust it slows down making one think the wind is not as strong as reality. We don't have any photos of the Sue vs wasp encounter.  After waving nicely several times, Sue had to resort to WD 40 spray to encourage the wasp to leave.  We do have a video of the power boater that ignored the "no-wake" signs and nearly passed the entire marina at high speed. but Mark yelled and waved him down. Those no-wake rules around marinas are there for a reason - someone might be working at the top of a mast.


      The other job we had to do was re-hang our radar reflector, which fell down right at the end of our last sailing season. It turns out the stainless ring connecting the shackle and radar reflector mount wore through from the constant rocking and rubbing after about 10 years of service. Another item to add to our routine maintenance list.


     We decided this time to eliminate the ring completely and use an extended shackle to connect to the radar reflector mount. Cuts out one more potential failure item. We run a flag halyard through a small block at the bottom of the radar reflector, run down to deck level, that holds the reflector taut (but doesn't prevent rocking) and provides a port side flag halyard.
   The final task was to reinstall the whisker pole topping lift line through the block on the front of the mast in front of Sue. I took the line down to wash it as all our running rigging accumulated extensive dirt while spending 2 years in the boatyard. All has been washed or replaced now.


   All jobs accomplished, its time to return to deck level. Another safe and successful trip to the mast top.

   Here's a couple views from the top:


New Dinghy

   Sue and I have talked about buying a hard bottom RIB dinghy to replace our high pressure floor dinghy we have now, to provide more peace of mind when exploring islands in the Bahamas - so we don't have to worry about punching a hole in the dinghy bottom on coral. However, our Avon high pressure floor dinghy has been working great since we bought it in 2003 and has the advantage of being able to roll up and store on deck when making offshore passages.
   Unfortunately for the Avon, when I inflated it this year, after two years in storage, it has slow leaks in two of the filler valves. I expect these leaks could be repaired, but the dinghy is 15 years old, well beyond normal service life and has seen better days.
  Meanwhile, Defender was having a sale of Achilles dinghies, which we have been investigating. So, we are the new owners of an Achilles HB300-FX hard bottom dinghy with a foldable transom. This is the compromise solution which has a solid fiberglass floor to protect from coral encounters, but has a foldable transom so we could fold it up and store it on the foredeck if we were to make a lengthy offshore passage (like to the Virgin Islands). But that would be a very rare event, so for normal usage in coastal waters where we can watch the weather/seas, we will just lift the dinghy on our davits.
 

New Hatch Covers

   After 15yrs, our hatch covers were highly crazed. Because of the way they are constructed, it is much simpler to replace the cover rather than install new plexiglass. The glass is embedded in the cover with a caulking which has to be dug out and then replaced - reportedly a very messy business by those DIYers who have discussed the process. Defender boat supplies just happened to have covers on sale, so I bought new ones.

  Simply replacing the covers makes this a 30min job rather than a couple days. The new covers look great and are crystal clear.

Dinghy Outboard Refit

    Before going into storage for 2 years, I had a new cooling impeller put in our Yamaha 8hp 2-cycle outboard and a thorough fresh water flushing of the engine. When we went to put the engine back in service, it started up after a few dozen pulls of the cord but, I couldnt get it to run for more than 30seconds.

   My first action was to thoroughly clean the carburetor of any deposits resulting from ethenol gas. But that was not the issue. My next thought was a defective fuel pump but, I decided it was just as easy to order a new carburetor (including new fuel pump) rather than trying out piecemeal solutions. Slapped in the new carb and the engine fired up on the first pull and runs like a champ. That's a great thing because you can't buy 2-cycle engines like this in USA anymore. Only 4-cycles are sold which weigh significantly more (and more than I can comfortably lift).

Hurricane Florence Avoidance

   Hurricane Florence provided a good opportunity to assess how ready we are to anchor out on the boat for extended periods and, how reliable the boat systems are going to be for winter cruising.

   Our marina (up on the right in the photo) makes all the heavier boats leave the marina for named storms as their pylons are not that firmly planted and the easterly winds/seas come straight up the creek through the marina. Besides, our slip is pretty narrow and not the place one would want to be in significant waves so we choose to always leave and anchor out for serious blows.  We anchor just up the creek in a fairly protected spot.


   Normally for expected hurricane conditions I would put out two anchor lines - our Bruce 44 on 200fteet of chain and our Fortress 37 on 200+ft of 3/4in nylon line. Neither of these anchors have ever dragged or plowed through the mud bottom of Chisman Creek (unlike a CQR we used a long time ago which plowed right through the mud.)
   For Florence, though, the forecast was only for 25-35kt winds at our location, so I went with our single Bruce44 on chain. I use a 1/2in twisted 3 strand line for a snubber with a heavy duty rubber snubber attached to the line as seen above. I tie the line onto the chain with a simple rolling hitch. I have never had a problem with this hitch.


   Florence turned out to be a non-event for the Hampton Roads area. We never saw any sustained winds over 25kts and only a few gusts higher. There were several showers, but not the heavy rains that the Carolinas received. The winds did stay at 25kts for several days, so we sat around from Wednesday to the following Monday before returning to the marina. That gave us 6 days to check out all the systems on the boat. 

   Most importantly, 6 days gave us time to train Rivah to do her potty work on the bow. She held out for 3 days, but ultimately had to go. With lots of rewards and treats, she pretty much had it down by day 6 and even "asked" to go forward a couple times and did her business. She should be ready to go south for the winter with us now and not be discomforted when she cant go ashore for several days.
 

   We had very few problems over the 6 days. One issue though was the pump gasket on the head had dried out over the past two years of storage so, this was a good opportunity to install the rebuild kit I had onboard. With new rubber gaskets properly lubricated the head worked like new. 
   We also were able to troubleshoot the wind generator which wasnt working properly. I found a ground wire that I had not connected when replacing the house battery bank. The wire was hidden behind the batteries and other wires so we hadn't seen it before.  Not having the wind generator, which would have provided us lots of charging in the 20kt winds, and no sun for the 6 days (so no solar charging), gave us the opportunity to test our Honda generator and boat battery charger which performed perfectly. We now have the wind generator working properly so are set for cloudy days in the future.

   The most uncomfortable aspect of Florence was 5 days of 100% humidity and mid-80s temperatures which left us warm and sweaty each day. We have a cockpit shower which worked properly but requires us to run the boat engine to heat our hot water. Our normal shower system which requires no boat power is our solar shower which can heat the water scalding hot in bright sunlight. We showered in the cockpit each evening before heading to bed. (We do have a shower below but that requires a significant cleaning/wipe down effort after each shower. Much more convenient to shower in the cockpit.)

   Nothing like a morning breakfast of eggs and toast and tea. The stove and refrigerator worked flawlessly for our 6 days. Looks like we are ready to head south.

Radar and AIS Working with new Chartplotter

     Finally completed installation of the new chartplotter and radar with AIS feed. This turned out to be a major task requiring a series of steps and upgrades and interfaces.


   It all started when my old generation (2006 technology) C70 chartplotter died in 2015.  It was going to be 500$ to repair my nearly 10yr old chartplotter. Meanwhile, Raymarine was offering a great deal on a new Es75 digital chartplotter - under 900$ for a normally 1500$ unit. So that's an easy decision, one would think. Except, it turns out you have to buy a new radar transmitter to be compatible with the new chartplotter. But they were offering another great deal - again, less than 900$ for a normal 1500$ radar. So, 1700$ for 3000$ worth of equipment.  But, the new equipment runs on SeaTalkNG ethernet rather than the old proprietary SeaTalk1 databus. So, you have to buy a ST NG to ST1 converter (shown on right in photo above) for another 100$. Also, the new radar requires a dedicated power line rather than simple single cable to the chartplotter (shown in center above). And you need a special interface cable for the AIS feed to the new chartplotter (shown on left).  The Raymarine folks felt sorry for me at this point and provided me this cable (35$) as a gift.
   Then you need a new circuit breaker for the radar power line and I dont have any spare spots so I had to reassign some breakers and move accessory equipment over to another breaker to use that one for the radar. Fortunately, it turned out I could accomplish that task with minimal disruption to my instrument panel. It looks like a lot of spaghetti, but there is a logic to all this wiring and it only took 1 day in 100degree heat factor weather to make these changes. Another day to run the power wire from here to the helm station and, another day to run the radar cable from the transmitter unit down to the helm.


    Another day to make all the connections and troubleshoot (the radar cable plug to chartplotter was not seated properly, AIS wire connections came apart when pulling radar cable through helm, and autopilot ST1 connection came off during all the wire pulling. All working today. One final day to secure all the cabling in place now that all is successfully operating.
  So I now have a fully functional new chartplotter, radar and AIS feed with the only problem being that my engine alternator interferes (turns the screen off for 10-15 seconds) with the chartplotter when the alternator is ramping up charging current from idle speed. Raymarine says a power stabilizer might fix that (another 140$).

***Post seatrial report:  I installed an interVolt power stabilizer ($118 on Amazon) which resolved the interference issue. All working properly now.

We're a Sailboat Again!

     Reinstalled headsails today. We had new UV protection Sunbrella covers put on the sails, after 15yrs in the sun. Put on new furling lines and washed the halyards.  Will finish the radar installation this week and should be sailing by the end of the month.

New Refrigerator Gaskets

   The last key project to complete before we can go cruising is to ensure the refrigerator is working properly. One task was to replace the 15yr old gaskets. This was a challenging task to drill the holes in the proper locations to fit the new gaskets properly. Hopefully it will be an improvement over the old gaskets which had gotten stiff.
 
     They certainly are an improvement in appearance, replacing the old mildew stained ones.

Deck Cleaned and "Woody Waxed"

     Finished the final cleaning and waxing project - the deck and cabin top - bringing the entire boat back to its pre-storage condition. After all the bottom and topsides work, then the teak refinishing, it was finally time to tackle the deck and cabin top. Spent 8hrs on my knees scrubbing up the Cetol drops and ground in dirt and bird droppings with lacquer thinner and rubbing compound, and couple hours rubbing out the oxidized flat surfaces. After a good washing with deck cleaner it was time for a coating of "Woody Wax", the wonder polymer coating that provides a protective coat against future bird droppings. Today I finished up by wiping down the teak to remove the white spots from the deck compounding. Boat really looks good.
   Installed the new furling lines and washed up the halyards. Ready now to put the sails back on.


Chain Locker Upgrade

     We have a PVC pipe and shelf in the chain locker to help the chain fall properly into the locker but, it still sticks to the shelf and "castles up" and jams the windlass, unless the chain is perfectly clean and scoured by sandy bottoms. Never the case in the Chesapeake. We decided to install an aluminum plate on the shelf to help the chain slide better.


   To work in the chain locker it helps to have a slender mate who can climb up to the peak -


    We'll see if this works any better than the starboard shelf.

**  Post trials report:  The aluminum shelf didn't make any improvement and might be worse. We will give it a little more testing but looks like we will be removing this and returning to the original starboard. We have previously tried spraying the starboard with Pam which seems to help. Key is to keep the shelf clean and slippery. It doesn't help that our chain is old and has surface rust and oxidation on it. 

Wind Generator and Radar Dome Re-Install

     With temperatures in the mid-90s and heat factor at 105, we are not putting in too many hours at the boat. Working a few hours in the morning and after dinner. Yesterday I got the new radar radome installed, but it will take some time to get it wired up. The new radar requires its own dedicated power source which means running a power cable to the helm station and installing a new breaker at the nav station. I dont have any free breaker spots so I have to reassign the small inverter breaker and move the breakers around so the radar is next to the chart plotter and Accessories down at the bottom. Meanwhile, I still have to run the cable video signal from the radar mount to the chart plotter at the helm.
   Today we re-installed the wind generator which had gone to EMarine in Fort Lauderdale for refurbishing in 2016 and has been sitting in my garage waiting for Tides Inn to go back in the water. Here's a couple photos of the before and after...


    Might be a while before I can confirm the wind generator is working properly, the batteries are fully charged by the solar panels.  I have the panels off now and need to run the batteries down somewhat when the wind is blowing to see if all is well with the wind generator. When its time to work on the refrigerator would be a good time. I am waiting for new gaskets for the refrigerator top.
   Tomorrow morning I will climb in the lazerette and start running radar cables before it gets too hot.